
The most reliable way to organize smoking accessories at home is to sort everything by category first — pipes and glass, papers and tips, lighters, grinders, rolling trays, and cleaning supplies — and then give each category its own container, drawer, or compartment inside one designated area. A rolling tray with built-in compartments handles the rolling surface, airtight glass or stainless containers handle smell containment, padded compartments or pouches protect glass pieces, and a lockable cabinet or drawer is the right anchor for any shared household. Once those four layers are in place, labels and a stable cool-and-dry environment keep the system usable week after week.
A home setup is more than a pile of containers. The published guides in this space approach organization as a small system with three parts: a category plan, a physical layout, and a maintenance habit. Each part supports the others, and skipping any one of them usually shows up within a month as clutter, lost items, or smell drift. This article walks through all three parts in order so you can build the system once instead of rebuilding it every time a drawer stops making sense.
Before buying anything, decide what "organized" means in your space. A studio apartment with one drawer and one shelf needs a different layout than a house with a spare closet. The good news is that the core category plan is the same either way — only the furniture anchor and the number of containers change. Start by counting what you actually own, then choose a layout that fits the count. [1] [4]
What Are the Main Ways to Organize Smoking Accessories at Home?
Most published guides on this topic start with the same category list and use it as the foundation of the system. The categories are pipes and glass, papers and tips, lighters, grinders, rolling trays, and cleaning supplies. Each category is then assigned to its own container, drawer, or tray inside a larger designated area. Sorting by category first means you can find any item by walking to its slot instead of digging through a mixed drawer.
Once the categories are set, the physical layout takes over. Three patterns show up in nearly every guide. The first is an open rolling-tray layout where everything sits on a tray or set of trays on a table or shelf, and the tray itself acts as the boundary. The second is a drawer organizer layout where modular dividers split one large drawer into labeled slots. The third is a lockable cabinet layout where a small cabinet, side table, or drawer holds everything behind a door.
Pick the layout that matches your living situation. A shared apartment or a home with kids usually calls for the lockable cabinet layout because it keeps accessories out of sight and out of reach. A private space with room for a desk or side table often works best with the rolling-tray layout because everything stays within arm’s reach during a session. A small space with one wide drawer is a natural fit for the drawer organizer layout. Each pattern can hold the same category plan; only the outer container changes. Bags / Cases The Puffco Enthusiast’s Dab Rig Station for All Things Puffco – Main Cannabis Gifts
Use the category list as the source of truth and the layout as the wrapper. If you change apartments or move the station to a new shelf, you keep the same categories and just move them into the new container. That is why guides describe the category-first approach as a habit rather than a one-time cleanup.
- Core categories used in published guides: pipes and glass, papers and tips, lighters, grinders, rolling trays, and cleaning supplies.
- Open rolling-tray layout: everything sits on trays on a shelf or table for fast access during a session.
- Drawer organizer layout: one wide drawer is split by modular dividers into one labeled slot per category.
- Lockable cabinet layout: a small cabinet, drawer, or side table hides the system behind a door or lid.
Which Storage Containers Work Best for Smoking Accessories?
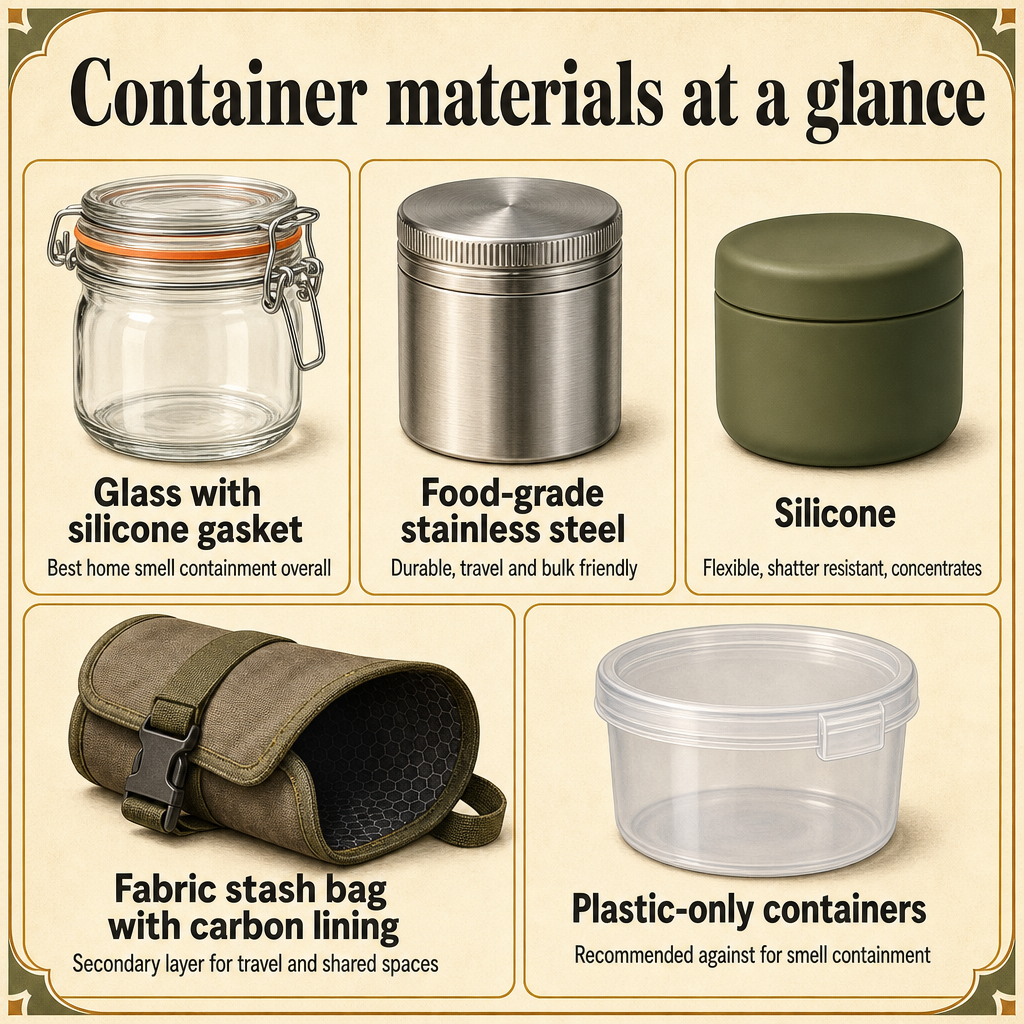
Storage containers for smoking accessories fall into a small number of material families, and each family has a specific role. The most common families are glass, stainless steel, silicone, fabric or wood, and plastic. Choosing the right family for each category is the heart of the system, and getting it wrong usually shows up as cracked glass, drifting smell, or containers that do not actually protect their contents. [2]
Glass containers, especially borosilicate glass jars with compression silicone gaskets, are widely treated as the best home option for smell containment. The glass wall does not absorb odor compounds, and the silicone gasket forms a tight seal around the rim. They are heavier than other options and can break if dropped, which is why they work best for stationary storage inside a cabinet rather than for daily travel.
Stainless steel containers, made from food-grade stainless, are durable and travel-friendly. They do not absorb odor either, and a metal wall stands up to bumps and drops in a backpack. The trade-off is that the contents are not visible without opening the lid, so labeling matters more.
Silicone containers are flexible and shatter-resistant. They are common for sticky materials like concentrates because nothing bonds to the silicone wall and the container can be squeezed to release the last bit. They are usually less airtight than glass or steel, so they are not the first choice when smell containment is the priority. [4]
Fabric and wood containers include stash boxes, roll-up kits, decorative wooden boxes, and carbon-lined bags. These are the outer layer in most setups. They hide the contents and add a layer of organization, but the inner smell containment still depends on a rigid jar. Plastic-only containers are described in published guides as the weakest option for smell containment because odor compounds pass through the plastic wall as well as the seal, so plastic-only containers are usually avoided for long-term storage. [2]
Choosing by material is simpler than choosing by brand. Decide the role of each container — stationary smell containment, travel, sticky materials, or outer hiding — then match a material family to that role. A typical home system has one or two glass jars, one stainless container for travel, a silicone jar for concentrates, and a wood or fabric box as the outer shell. See How Do I Store My Smoking Accessories the Right Way? for a fuller walk-through of how each material is used in a complete storage plan.
- Glass with a silicone gasket: best for stationary smell containment at home; heavier and breakable.
- Food-grade stainless steel: durable, travel-friendly, opaque so labels matter; does not absorb odor.
- Silicone: flexible and shatter-resistant; common for concentrates; usually less airtight than glass or steel.
- Fabric or wood: outer shell that hides contents; relies on an inner rigid jar for actual smell containment.
- Plastic-only containers: recommended against for smell containment because odor compounds pass through the plastic wall.
| Material | Best used for | Main trade-off |
|---|---|---|
| Glass with silicone gasket | Stationary home smell containment | Heavier, can break if dropped |
| Food-grade stainless steel | Travel, bulk storage, opaque setups | Contents not visible without opening |
| Silicone | Concentrates, sticky materials | Less airtight than glass or steel |
| Fabric or wood | Outer shell, hiding contents | Needs an inner rigid jar for smell |
| Plastic-only containers | Short-term, low-stakes storage | Weakest smell containment of the group |
How Do You Build a Dedicated Smoking Station or Smoking Area at Home?
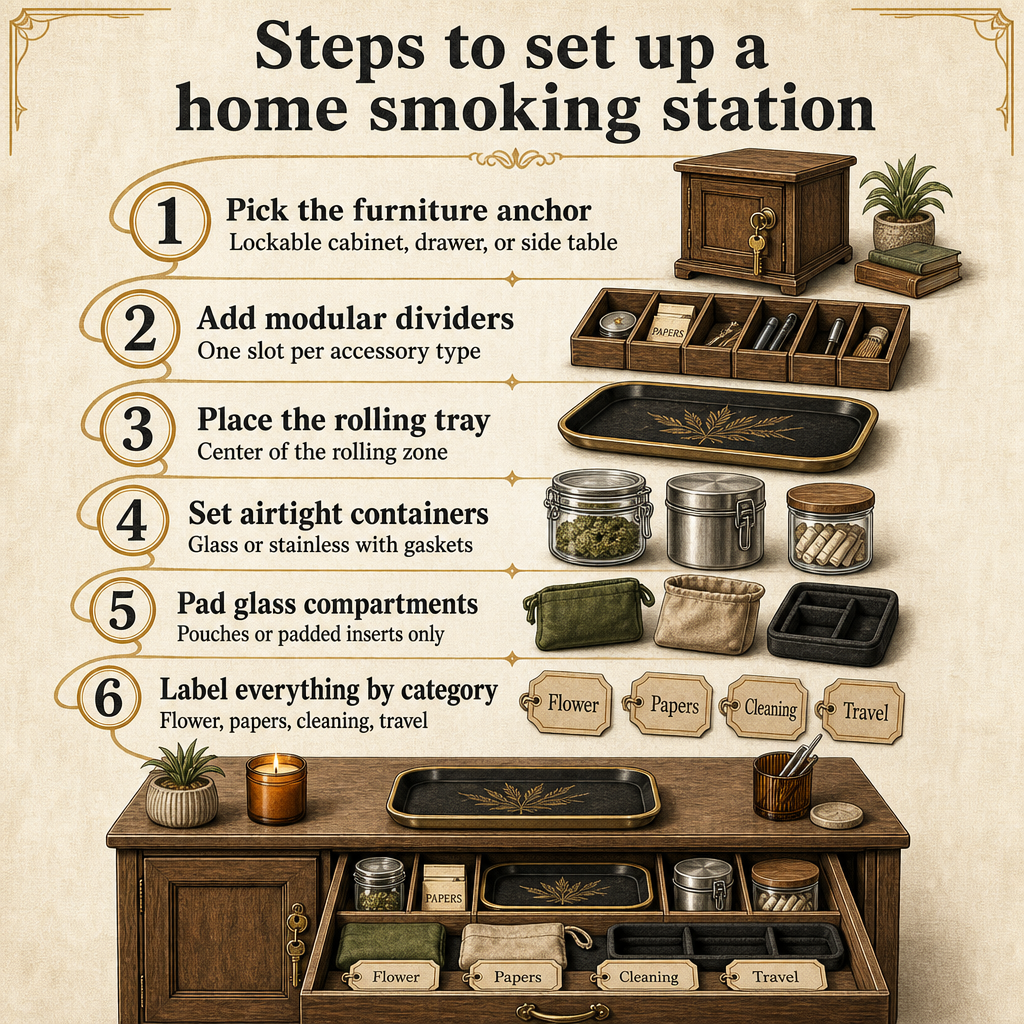
A dedicated smoking station or smoking area is the physical anchor of the system. It is a piece of furniture or a defined corner of a room where every accessory lives, where the rolling tray sits, and where cleanup happens. Building one is a small project, not a single purchase, and the order of the steps matters. [3] [4]
Start by picking the furniture anchor. The most common anchors are a lockable cabinet, a wide drawer, a side table with hidden storage, or a floating shelf with a small cabinet underneath. The anchor needs to hold the trays, containers, and glass pieces without crowding, and it should be at a height that lets you see every slot without bending.
Next, add modular dividers inside the anchor. Dividers turn one large space into many small slots, and they are the part that actually does the organizing. A divider system can be as simple as small boxes inside a drawer or as built-out as labeled inserts in a lockable cabinet. The published guides describe this as the step that turns furniture into an organization system.
Place the rolling tray at the center of the rolling zone. The tray is the working surface, and it usually sits on top of or just outside the anchor so it is easy to lift and pour out. Once the tray is placed, put the airtight containers for the smell-sensitive items on the same shelf or in the same drawer so the most-used items are within reach.
Pad the glass compartments before adding anything fragile. Pouches, padded inserts, or dedicated compartments separate glass from the harder metal pieces so chips and cracks do not happen when the drawer or cabinet is opened and closed.
Finish by labeling every container and slot. A simple label on each jar or box — flower, papers, tips, lighter, grinder, cleaning, travel — keeps categories from blending and makes a quick inventory check possible. If you are also working out which accessories to buy first, see What Smoking Accessories Do Beginners Need to Buy First? for a beginner-friendly checklist that matches the same category plan.
Once the station is built, leave it alone for a week and notice which categories you actually reach for and which you do not. The labels and slots can then be tuned to match real use, with the most-used items closest to the front and the rarely-used items at the back or in a separate overflow box.
- Pick the furniture anchor first: lockable cabinet, drawer, side table, or floating shelf with a cabinet underneath.
- Add modular dividers so one large space becomes many small slots, one slot per accessory type.
- Place the rolling tray at the center of the rolling zone, easy to lift and to pour out.
- Set airtight glass or stainless containers with gaskets on the same shelf as the tray.
- Pad glass compartments with pouches or padded inserts before loading any fragile pieces.
- Label every container and slot by category so the system stays readable after a busy week.
What Role Does a Rolling Tray Play in Keeping Accessories Organized?
A rolling tray is the central surface in most published guides on smoking station organization. It defines a boundary for grinding, packing, and cleanup, and it is the one item that almost every setup has in common. The tray is not just a rolling surface — it is also a containment system when the session ends, because everything loose on the tray can be folded back into its compartment.
Trays come in a few common shapes. The simplest is a flat metal tray with raised edges. The next step up is a tray with built-in compartments along one or two sides for small items like tips, papers, and a one-hitter. The most built-out option is a tray with a removable inner tray, which adds a second layer of organization inside the tray itself. [1]
For organization specifically, the features that matter are the compartments, the edge height, and the surface material. Compartments keep small items from sliding into a pile at one corner. Edge height matters because a low edge lets things slide off during use, while a tall edge doubles as a containment wall during transport. A smooth surface is easier to wipe clean than a textured one, which makes the weekly maintenance habit easier.
Layer the tray inside the broader station rather than treating it as a standalone item. The tray sits on the furniture anchor or just outside it, the airtight containers live on the same shelf, and the glass pieces are padded in their own compartments. The tray is the working surface; the anchor is the storage; the labels tie them together. Accessories
When the tray itself is part of the system, cleanup is faster. At the end of a session, anything left on the tray goes back into its slot, the tray is wiped, and the station is back to a known state. Without a tray as a boundary, the same items end up scattered across the anchor furniture and the system slowly breaks down.
- Compartment layout: built-in slots along one or two sides keep small items in place.
- Removable inner tray: adds a second organization layer inside the main tray.
- Edge height: a taller edge contains loose items during use and during transport.
- Surface material: a smooth surface wipes clean more easily than a textured one.
- Placement: the tray sits on the anchor or just outside it, with airtight containers on the same shelf.
When Should You Use Smell-Proof or Airtight Containers?
Smell-proof and airtight are not the same thing in the container industry, even though the words are sometimes used interchangeably. An airtight container uses a non-porous wall — borosilicate glass or food-grade stainless steel — paired with a compression silicone gasket. A smell-proof bag or soft case is typically fabric with an activated-carbon lining. Knowing which one fits which situation is what keeps the system from overbuying or under-protecting. [2]
Use airtight rigid containers when the priority is reliable, long-term home storage. These are the right call for the jars that sit on the shelf inside the cabinet or drawer. They handle repeated opening and closing, and they do not lose their seal as the gasket ages.
Use carbon-lined fabric bags or roll-up kits as a secondary layer for travel, shared housing, or any setup where odor control is the priority over visibility. The carbon layer adsorbs odor compounds that escape past the rigid container, and the fabric outer shell keeps the bag flexible enough to pack. [3]
Skip plastic-only containers for smell containment. Plastic walls themselves allow odor compounds to pass through, not just the seal, so even a tightly latched plastic box will lose effectiveness over time. If a plastic container is all that is available, use it as a short-term or low-stakes option rather than a smell-containment solution.
Match the container to the situation, not to a marketing label. A simple opaque box is enough for items where smell is not the concern. A rigid airtight jar is the right call for smell-sensitive items in stationary storage. A carbon-lined bag is the right call for the travel sub-kit, where flexibility matters more than rigidity.
A useful related walk-through is What Makes a Storage Container Smell Proof?, which covers how these container types are actually built and what to expect from each one in real use. Pairing that guide with the categories in this article usually clears up the few cases where the labels are confusing.
- Use airtight rigid jars (glass or stainless with gaskets) for stationary home smell containment.
- Use carbon-lined fabric bags as a secondary layer for travel and shared spaces.
- Use a simple opaque box for items where smell containment is not the priority.
- Avoid plastic-only containers for any setup where smell containment matters, because the wall itself transmits odor.
- Match the container type to the situation rather than to a marketing term.
How Do You Organize Smoking Accessories on a Budget and in Shared Spaces?
Budget organization is mostly about repurposing household items that already exist. Mason jars, shoeboxes, small bowls, dollar-store drawer organizers, and DIY wood or cardboard boxes all work as containers when paired with one or two purchased core items, like a tray or a small lockable case. The category plan is the same as the more expensive version — only the materials change. [1]
For a budget build, spend money on the two items that do the most work. The first is the rolling tray, because it defines the working surface and is the one item that gets handled every session. The second is a lockable case or a small cabinet, because shared spaces need a way to keep the system out of sight. The rest of the containers can be repurposed household items.
Shared spaces add rules on top of the category plan. State public-safety guidance recommends keeping cannabis products in child-resistant packaging or in a locked cabinet, drawer, or lockbox that is out of sight and out of reach of children. Containers should be clearly labeled, and storage should change as children get older. The same guidance lists Poison Help at 1-800-222-1222 for accidental child ingestion. [5]
The same guidance notes that securely stored cannabis reduces the risk of accidental pet ingestion, because pets getting into cannabis products can make them sick and veterinary visits for this reason have been increasing. A locked drawer or cabinet covers both cases with one habit.
Labeling is the cheapest and most effective shared-space habit. Containers labeled by use — flower, papers, cleaning, travel — keep categories from blending and let a guest or family member tell at a glance what each container holds. A set of Lighters in a labeled bowl is a small example of how a shared-space system reads at a glance.
Build the budget version in two passes. The first pass uses repurposed containers and the two core purchases to get a working station on day one. The second pass, a few weeks later, replaces the weakest repurposed container — usually the one that leaks smell or breaks — with a proper airtight jar. That staggered build keeps the cost manageable without leaving the system half-built.
- Repurpose household items as containers: mason jars, shoeboxes, small bowls, dollar-store drawer organizers, and DIY boxes.
- Spend budget money on the two items that do the most work: a rolling tray and a lockable case or cabinet.
- Follow state public-safety guidance for shared spaces: child-resistant packaging, locked cabinet or drawer, clear labels, and out of reach.
- Keep Poison Help (1-800-222-1222) visible near the station for accidental child ingestion.
- Secure storage also reduces the chance that pets get into cannabis products by accident.
- Build in two passes: a working station on day one, then upgrade the weakest container a few weeks later.
Frequently Asked Questions
How should accessories be stored in a shared household or apartment?
Most published guides recommend keeping accessories in child-resistant packaging or in a locked cabinet, drawer, or lockbox that is out of sight and out of reach, with containers clearly labeled by use so guests and family members can tell categories apart.
How do you keep glass pieces safe during storage and organization?
Store glass pieces padded — in fabric pouches, padded cases, or dedicated compartments — and keep them separated from harder metal items so chips and cracks do not happen when the drawer or cabinet is opened and closed.
How do travel-ready accessories fit into a home organization system?
Make travel its own sub-system: keep a padded travel case or smell-proof roll-up bag loaded with the go-to subset of accessories so the home station stays intact every time you leave, with no repacking at the door.
How can you organize accessories for flower, dry herb vaporizers, and concentrates in one place?
Use separate labeled containers for each consumption method inside a larger modular tray or drawer system, so a grinder, one-hitter, vaporizer, papers, tips, lighter, and cleaning brush each have their own slot rather than mixing together.
What is the difference between a smell-proof bag and an airtight container?
An airtight container uses a non-porous wall (borosilicate glass or food-grade stainless) plus a compression silicone gasket; a smell-proof bag is typically fabric with an activated-carbon lining and works as a secondary layer inside or alongside the rigid container for travel and shared spaces.
Where Does a Home Smoking Organization System Go From Here?
A home organization system is small but it has three moving parts that all need to keep working: the category plan, the physical layout, and the maintenance habit. The category plan is the list of groups — pipes and glass, papers and tips, lighters, grinders, rolling trays, and cleaning supplies — and that list rarely changes once it is set. The physical layout is the furniture anchor and the containers inside it, and it changes when the space changes. The maintenance habit is the weekly reset that puts everything back into its slot.
Once the three parts are running, the system is easy to live with. New accessories drop into an existing slot. A new shelf or cabinet becomes a move, not a rebuild. A travel day is one grab from the pre-packed travel kit, not a repacking session at the door. That is the real test of an organization system: not how it looks on day one, but how it holds up on day ninety. Treehouse Lifestyle offers free shipping on orders $150+ for the rolling trays, airtight containers, and lockable cases that anchor this kind of setup.
If you are starting from scratch, build the category plan and the rolling tray first, then add airtight jars for smell containment, then add a lockable anchor for the shared-space rules. Each step makes the next one easier, and the system is usually complete within a single afternoon.
Sources
- Kashmir420: Up in Smoke: The Power Of Well-Organized Cannabis Accessories
- Keefer’s Cannabis Chronicles: Best Smell Proof Containers for Weed in 2026: The Truth About What Works
- Green Society: Home Organization Ideas for Cannabis Enthusiasts
- Chill Steel Pipes: How to Store Cannabis Accessories Safely: Expert Tips & Best Practices
- Colorado Department of Revenue, Marijuana Enforcement Division (via cannabis.colorado.gov): Safe storage